|
|
 New Releases | FAQs | Popular | Picks | Features | MP3 Converter |
|
|
| |||||
How to convert M4P to MP3?Record M4P music when you play it and convert to MP3MP3 is now the most popular audio format for music thanks to the wide usage of the Internet. It features a very high compression rate and excellent audio quality, these features are very useful for music distribution on the web. It is clearly a standard online format and has resulted in the creation of dozens of software tools (like Napster and Gnutella) that encourage MP3 sharing/copying via the web.M4P format is "protected AAC". MPEG-4 Part 3 (formally ISO/IEC 14496-3) is, as the name suggests, the third part of the ISO/IEC MPEG-4 international standard. It specifies audio coding methods. It is a format of purchased music that can be listened to only through the iTunes softer or an iPod. If we want to to enjoy M4P music on our MP3 player, you should convert M4P to MP3. But how to convert M4P file to MP3? It was clear that the M4P to MP3 converter is needed at first. Following is the right software that can help you.  Download the SoundTaxi here
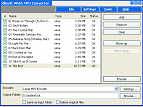
Here is the step by step guide of this program, tell you how to convert M4P music to MP3 file with Xilisoft Audio Converter, and the processes are very fast and easy to handle. Step 1. First of all, download and install Xilisoft Audio Converter. Step 2. Use "ADD" button on the main window or "ADD" in the "File" menu to select your original M4P file first, and then open the folder where your M4P files are located, all supported files will be listed automatically. Step 3. Select a M4P file or several files. The file(s) you highlighted will be loaded after you click "Open". Step 4. Use "Remove" button to remove the loaded file which you highlight; "Clear" button to clear all the files you selected. Those buttons can also be found in the "File" menu. Step 5. Select target file format--MP3 to output. Highlight your loaded file first and then select output format from "En-coder" combo-box. Now you should select "Lame MP3 En-coder". Step 6. To set the folder that you want to save your target MP3 file, you may select the Output folder by clicking "Browse..." button or directly enter a path in the "Destination" box. "C:\temp" is setted as the default destination folder. Step 7. You can adjust some special setting for your conversion by clicking "Settings" behind the "Encoder" combo-box, such as "Bit Rate" and "Sample Rate". Step 8. As the last step, just click "Encode" to start your conversion. You can see "OK" under the "Status" column which means you got a successful conversion. Step 9. What to do now? Just enjoy your music. Our software keeps the quality as good as the original files. Please give this page a point
|
|
|||||||||||||
Copyright © 2002-2006 TomDownload.com Tom's Software Downloads Site.
|


